Secure Grok Gmail Connection with PortEden
This guide sets up a secure Grok and Gmail connection using PortEden as the data firewall. You add one Custom MCP URL in Grok, sign in, and Grok can read and act on Gmail through scoped permissions, with PII redacted before it reaches xAI and every tool call recorded in the PortEden audit log. No prior PortEden signup needed.
In short
- Start in Grok. Add one Custom MCP URL:
https://mcp.porteden.com/email - PortEden's auth window opens. Sign in or sign up in one click. No prior PortEden setup required.
- If Gmail is already connected to your PortEden account, the Gmail authorization step is skipped automatically.
- Verify with a read prompt. Tighten permissions, redaction, and contact rules later from my.porteden.com.
What you get
When the connection is live, Grok can search, summarize, draft, and reply through Gmail using natural language. Every tool call routes through PortEden, which applies:
Real-time redaction
Names, emails, phone numbers, account IDs, and 50+ other identifier types are stripped or tokenized before content reaches Grok.
Per-action permissions
Grant read, draft, send, archive, delete, or label as separate scopes. A read-only token literally cannot send a message.
Contact and time rules
Block or allow specific senders, restrict access to working hours, exclude entire labels, or hide content older than a date.
Audit trail
Every tool call from Grok is logged: the requested action, the decision (allow, redact, or block), and the response shape returned. SIEM-exportable.
Prerequisites
- A Grok account at grok.com on a plan that supports Connectors and Custom MCP. As of May 2026, this is available on Grok's paid tiers.
- A Gmail account you want Grok to use. You will authorize it during the flow if your PortEden account does not already have Gmail connected.
No PortEden account yet? That is fine.
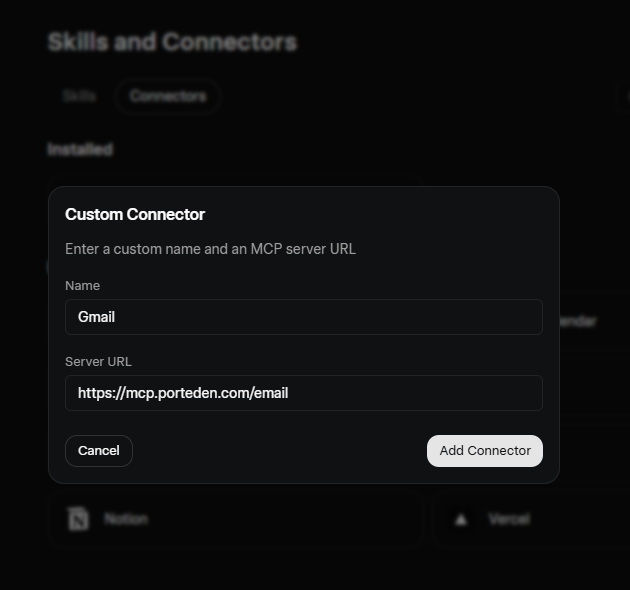
Step 1: Add the PortEden MCP Connector in Grok
Start in Grok. PortEden runs a hosted MCP server you can connect with one URL. Nothing to install, nothing to deploy.
Connector values
| Field | Value |
|---|---|
| Connector name | Gmail |
| MCP server URL | https://mcp.porteden.com/email |
| Authentication | OAuth (handled by PortEden) |
Just the URL is enough
Want more than email later?
Each PortEden capability has its own MCP URL. Add them as additional Custom Connectors in Grok the same way. Use the capability name as the connector name so Grok picks the right one.
{ "Gmail": "https://mcp.porteden.com/email", "Calendar": "https://mcp.porteden.com/calendar", "Drive": "https://mcp.porteden.com/drive", "Google Docs": "https://mcp.porteden.com/google-docs", "Google Sheets": "https://mcp.porteden.com/google-sheets", "Tasks": "https://mcp.porteden.com/tasks" } Step 2: Sign in to PortEden
When Grok enables the connector, it opens a PortEden auth window. This is the single setup screen you will see. There is nothing to do in advance.
What the token looks like
Step 3: Connect Gmail (first-time only)
This step runs only if your PortEden account does not already have Gmail connected. If it does, PortEden reuses the existing Gmail connection and you can jump straight to Step 4.
If Gmail is not connected yet
If Gmail is already connected to PortEden
You will not see a Gmail authorization prompt at all. PortEden detects the existing connection, attaches it to the new Grok token, and returns you to Grok in a couple of seconds. This is the most common path for existing PortEden users.
Workspace accounts
gmail.readonly, plus gmail.send and gmail.modify if Grok will draft, send, or label. See the Google OAuth Setup guide if you need a custom OAuth app.Step 4: Verify the connection
Open a new Grok chat and run a low-risk read prompt. Then check the PortEden audit log to confirm the request shows up.
Try one of these
What to confirm
- Grok returns real data from your Gmail, not a refusal or an error.
- Sensitive identifiers (full email addresses, phone numbers) appear redacted or tokenized if you left redaction enabled.
- The PortEden audit log at my.porteden.com shows the request with a green allow decision.
No data yet? Ask Grok to introspect
search_emails, get_email, and list_threads.Step 5: Tighten what Grok can do (optional)
The token PortEden created in Step 2 already uses conservative defaults: email scope only, redaction on, and confirm-before-write for send and delete. Once the connection works end-to-end, you can tighten or relax it from my.porteden.com under Access Tokens. Find the token tied to the Grok connector and edit it.
Permission presets for Grok
Pick the action set that matches what you want Grok to do
| Preset | What Grok can do | What it cannot do |
|---|---|---|
| read_only | Search, read, summarize, and quote messages | Send, draft, label, archive, delete |
| read_and_draft (default) | Read plus create drafts in the Drafts folder | Send anything outside of drafts |
| read_send | Read plus send replies and new messages | Delete or modify labels |
| full_email | All email actions including label and archive | Touch other PortEden capabilities (calendar, drive) |
Recommended rules for a Grok token
- Redaction: Leave on. PortEden strips names, emails, phone numbers, and document IDs by default.
- Contact blocklist: Add HR, legal, and personal aliases (or whole domains) you do not want Grok touching.
- Time window: Restrict to messages from the last 90 days unless you have a specific reason to grant historical access.
- Label exclusions: Block
Confidential,Legal, and any client-specific labels under NDA. - Confirm before write: Keep on for send and delete so Grok surfaces a preview before acting.
Changes apply immediately
Suggested prompts for everyday use
Once the connection is verified, these prompts are good starting points. Each maps to a single PortEden tool call, so behavior is predictable and the audit log stays clean.
"Summarize my unread emails from today into three buckets: urgent, replies needed, and FYI."
"Find every email from acme.com in the last 60 days and group them by thread."
"Draft a polite reply to the latest message from Sarah declining the meeting and proposing next Tuesday."
"List threads where I sent the last message more than five days ago and have not received a reply."
"Send a short note to the design list confirming Friday at 10am. Confirm with me before sending."
"Find newsletters I have not opened in 30 days and propose a list to archive."
Troubleshooting and error handling
PortEden returns structured errors that Grok surfaces in its replies. Match the message you see to the table below, then jump to the matching debug prompt in the next section.
Grok cannot reach the PortEden MCP server
Symptoms
- Grok says "I could not reach the connector" or "Custom MCP server unavailable".
- No request appears in the PortEden audit log.
Checks
- Confirm the MCP URL in the Grok Custom Connector is exactly https://mcp.porteden.com/email (no trailing slash, no typos).
- Make sure the connector is Enabled in your Grok workspace, not just Saved.
- Check Grok's connector status page for any global xAI incident.
Debug prompt for Grok
PortEden auth window did not appear
Symptoms
- You enabled the connector in Grok but no PortEden sign-in window opened.
- The connector stays in a Pending or Needs auth state.
Checks
- Allow pop-ups for grok.com in your browser, then click Enable on the connector again.
- If you have multiple Grok tabs open, close them and retry in a single tab so the auth callback can find the right window.
- Open my.porteden.com in another tab and sign in there first. Grok will detect the active session on the next attempt.
- Try a different browser if a strict privacy extension is blocking the cross-origin auth handshake.
Debug prompt for Grok
401 Unauthorized after the connection was working
Symptoms
- Calls used to work but now all Gmail tool calls from Grok fail immediately.
- Audit log shows an auth_failed or token_revoked entry.
Checks
- Open my.porteden.com, go to Access Tokens, and check the token tied to the Grok connector. It may have been revoked, expired, or rotated.
- If the token is gone, return to Grok and click Reconnect on the Gmail connector. PortEden will issue a fresh token via OAuth.
- If you intentionally revoked it from another device, reconnect from Grok to issue a new one.
Debug prompt for Grok
403 Permission denied on a specific action
Symptoms
- Grok says "I do not have permission to do that" or returns an accessInfo string explaining the rejection.
- Audit log shows a block decision with a rule name.
Checks
- Open the Access Token in PortEden and read the permission set. The action Grok tried may not be enabled (e.g., a read_only token cannot send).
- Check the contact and label rules. A blocked sender or excluded label will deny matching messages.
- Look at the time window. Requests outside the allowed time window are blocked.
- Adjust the token, save, then ask Grok to retry. The new policy applies on the next request.
Debug prompt for Grok
429 Too Many Requests or quota exceeded
Symptoms
- Bursts of tool calls start failing after the first few succeed.
- Audit log shows rate_limited or quota_exceeded entries.
Checks
- Check your PortEden plan limits at my.porteden.com on the Billing page.
- Spread bursty work over time, or ask Grok to batch requests (for example, retrieve 20 messages in one call instead of 20 single calls).
- If you keep hitting the cap, upgrade the plan or contact PortEden support.
Debug prompt for Grok
Grok complains it lost the context
Symptoms
- Grok mentions placeholders such as [REDACTED_EMAIL] or [PERSON_1] and asks for more context.
- Drafted replies refer to anonymized names instead of real ones.
Checks
- Decide whether the redacted fields are required for Grok to do its job. PortEden defaults are conservative.
- If you trust Grok with names of internal contacts, open the Access Token and disable name redaction or add the contacts to an allowlist.
- For drafts that need to address someone by name, switch to a token preset that preserves first names.
Debug prompt for Grok
Gmail returned reauth required
Symptoms
- Calls were working, then all email tools start failing.
- Audit log shows a provider_reauth_required entry.
Checks
- Open Connections in PortEden. Gmail will show a yellow Needs reauth badge.
- Click Reconnect and complete the Google OAuth flow again. This usually happens after a password change or a Google security event.
Debug prompt for Grok
Debug prompts for Grok
When something is wrong but the error message is vague, paste one of these prompts into Grok. They are designed to make Grok self-report the structured response from PortEden so you can pinpoint the cause without leaving the chat.
Pair every debug prompt with the audit log
Security best practices
One token per AI per use case. Do not reuse a token across Grok, Claude, and ChatGPT. Per-AI tokens let you revoke just the one that misbehaves.
Start with read_only and add permissions as the workflow demands them. It is easier to grant than to clean up after.
Keep redaction on for first-time setups. Turn off individual fields after you confirm Grok really needs them and the audit log shows no surprises.
Use Confirm-before-write for any token with send, delete, or label permissions. Grok will then surface a preview before any destructive action.
Review the audit log weekly. Filter by the Grok token to see what was asked, what was allowed, and what was blocked.
Revoke tokens promptly when a project ends. Revocation is instant and does not require touching Google or Grok.
FAQ
Do I need a PortEden account before I start?
No. Start in Grok. When you add the PortEden MCP URL as a Custom Connector and Grok opens the auth window, you can sign up at that moment with Google one-click or with email. If you already have an account, it signs you in instead.
I already have a PortEden account with Gmail connected. Do I need to reauthorize Gmail?
No. PortEden detects your existing Gmail connection during the Grok auth flow and skips the Google OAuth step automatically. Grok comes back to the chat ready to use, usually in a couple of seconds.
Does Grok store my Gmail OAuth token when I use PortEden?
No. The Google OAuth credentials stay inside PortEden. Grok only sees a PortEden Access Token, which you can revoke at any time without breaking the underlying Google connection.
Will Grok train on my Gmail content?
Vendor training policies vary by tier and over time. PortEden reduces the data Grok receives in the first place: PII is redacted, fields are minimized, and you can scope access to read-only, specific contacts, or time windows. Check Grok's current data use policy for your plan and confirm with xAI for enterprise commitments.
What if I want Grok to send mail without my approval each time?
Open the Access Token in my.porteden.com and turn off Confirm-before-write for the send action. Be deliberate about this. You can keep confirmation on for delete while leaving send unconfirmed.
Can I connect multiple Gmail accounts?
Yes. Each Gmail connection lives independently in PortEden. Add a second Custom MCP Connector in Grok pointing at the same URL with a distinct, descriptive name (for example 'Work Gmail' and 'Personal Gmail'), sign in to PortEden under the matching account during the auth flow, and connect the second Gmail. The name is what Grok uses to pick between them, so keep it short and human.
Does this work with Outlook or M365 email?
Yes. PortEden's email capability covers Gmail, Outlook (Microsoft 365), and Exchange. The MCP URL is the same: https://mcp.porteden.com/email. The auth flow lets you connect Outlook instead of Gmail when prompted.
Next steps
PortEden for Grok
Capabilities, pricing, and deeper architecture notes for using Grok with PortEden.
MCP Email tool reference
All 8 email tools exposed by the PortEden MCP server, with arguments and responses.
Access rules reference
Every rule type PortEden supports: contacts, time windows, redaction, action limits, scope, and field visibility.
Risks of connecting email to AI
A regulator-aware look at what can go wrong, and how PortEden mitigates each risk.